


Cracked Keys: Preventing Damage to Plastic Keytops
This article provides information about two common issues with piano keys - cracked plastic keytops and warped keys. The article identifies potential causes of these issues, such as exposure to chemicals or humidity, and provides solutions to address them. It also offers guidance on the correct methods for replacing keytops and straightening warped keys using steam, a C-clamp, and weights. The article emphasizes the importance of regulating the keytops to ensure proper functioning of the piano.

What are the causes of plastic keytops cracking?
I just repaired a set of keys that had several cracks. Can you help me understand what caused these cracks?
What is the cause of the crosswise cracks that I found on the white keys?
A cracked key can usually be caused by a chemical reaction of some kind or by continued humidity in the room. In other cases the key covers can be damaged by moths.
The constant closure of the key cover could have concentrated fumes in the area of the keytops, if indeed the moth cakes were the cause of the cracking. To remedy the issue, I removed the moth cakes and had the keys recovered. Since then, there have been no further issues with the piano.
The only other known cause for this condition would be the application of silicone. Silicones are present in some polishing products and are becoming more commonly used as a lubricant. Unfortunately, they possess two characteristics that make their use risky in piano work.
Firstly, silicones have a tendency to creep and will not remain where they are applied. Since they are invisible, the technician cannot determine where they have gone. Silicone solutions must be stored in glass bottles with a rubber stopper, as they will creep through the walls of plastic bottles. Metal jugs with metal, rubber, or glass lids can also be used, but even the presence of a plastic gasket in the lid can cause the silicone to escape.
Secondly, silicone is a stress-relieving agent. When a keytop is glued to a key, various invisible stresses are inevitably induced in the plastic. The application of silicone to the keytop will cause it to crack wherever it is stressed.
Silicone cannot be removed by washing or any other means and cannot even be sanded off due to its penetrating characteristics. Once applied, it becomes a permanent part of the piano and can even penetrate and ruin a pin-block or cause bass string windings to loosen. In my opinion, these risks far outweigh any benefits in lubrication or polishing that silicone products may offer. Therefore, I do not recommend their use in piano maintenance.
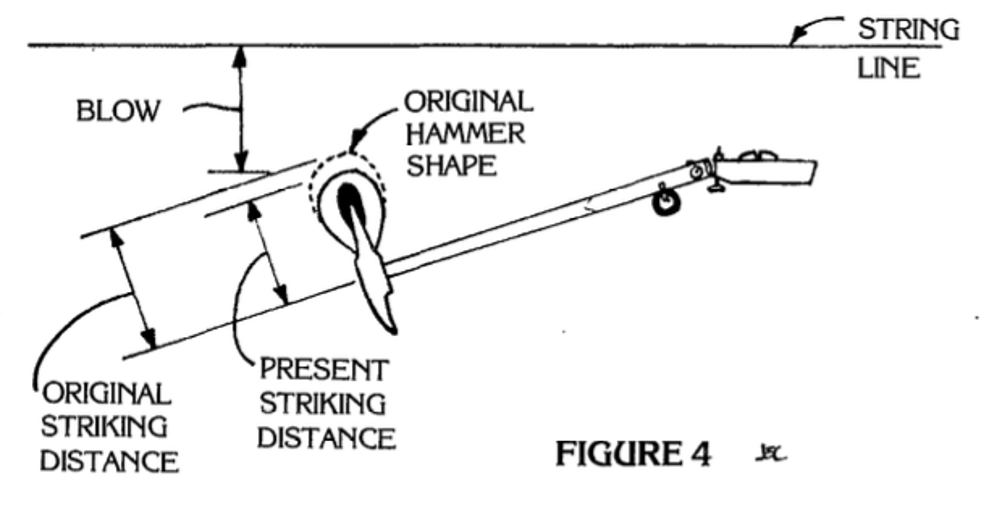
The second part of the inquiry concerns the installation of molded keytops. These keytops are typically three to four times thicker than the original keytops, thus causing clearance issues. Raising the keystrip may result in interference or misalignment with other parts of the case, which is not an ideal solution. While filing the back ends of the keytops may seem like a solution, it will not address the issue of the sharps being buried when depressed. At full dip, the sharp should be 1/8 inch above the naturals. If thicker keytop material is used on the whites, the sharps will be too low in comparison. If the technician attempts to compensate for this issue by adding punchings to the balance rail under the sharps, two new issues arise: (1) The action geometry between key and whippen is altered for the sharps, particularly in a direct blow action, and (2) the wood of the keys behind the sharp tops will also contact the keystrip since the entire key was raised instead of only the keytop.
The correct method to replace white keytops is to mill the keys down (remove wood) to ensure that the top of the new keytop is at the same height as the top of the old keytop. The thicker the new keytop material, the more wood must be removed. Likewise, old fronts must be removed if new fronts or front-top molded units are to be installed; otherwise, the new fronts may bind against the keyslip. This will maintain the dimensions of the key, the original regulation specifications will apply, and the keys will fit into the piano.
Unless a technician possesses specialized key-recovering equipment, it is usually not economically feasible to do key recovering on their own. I can tune five or six pianos, install a new pinblock, or install and regulate two sets of grand dampers in the time it takes me to correctly recover a set of keys. Key-recovering shops charge low prices, making it impractical for me to recover keys on my own. Our time is the main thing we have to sell, so we might as well sell it at a reasonable profit if we can. When sending keys out for repair or recovering, it is a good idea to insure them.
Warped Keys
Sometimes we encounter a key that is so warped or twisted that it must be straightened with steam. This is how I accomplish it.
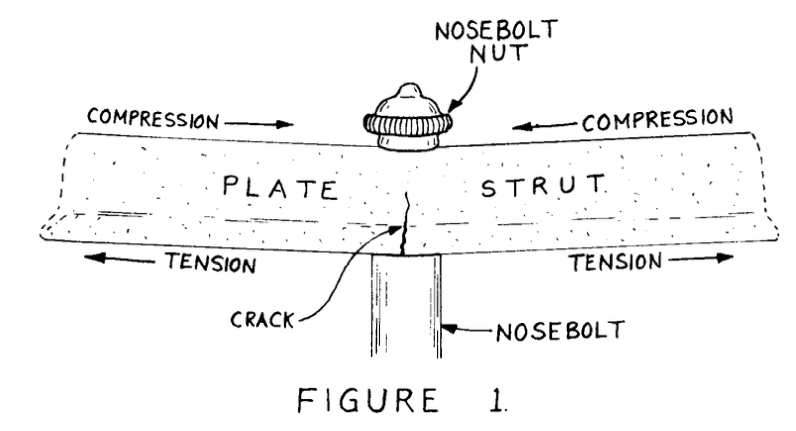
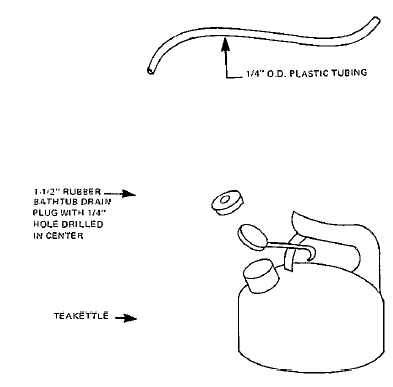
To create the steamer, use a standard closed metal teakettle with a 1-1/2 inch rubber tub drain plug wedged into the opening. Drill a 1/4 inch hole through the plug and insert a length of plastic tubing. When the water in the teakettle is heated over a hotplate or burner of some sort, the steam will exit from the end of the tubing and can be directed as required. The steamer may be mounted beneath or near a workbench (see Figure 1).
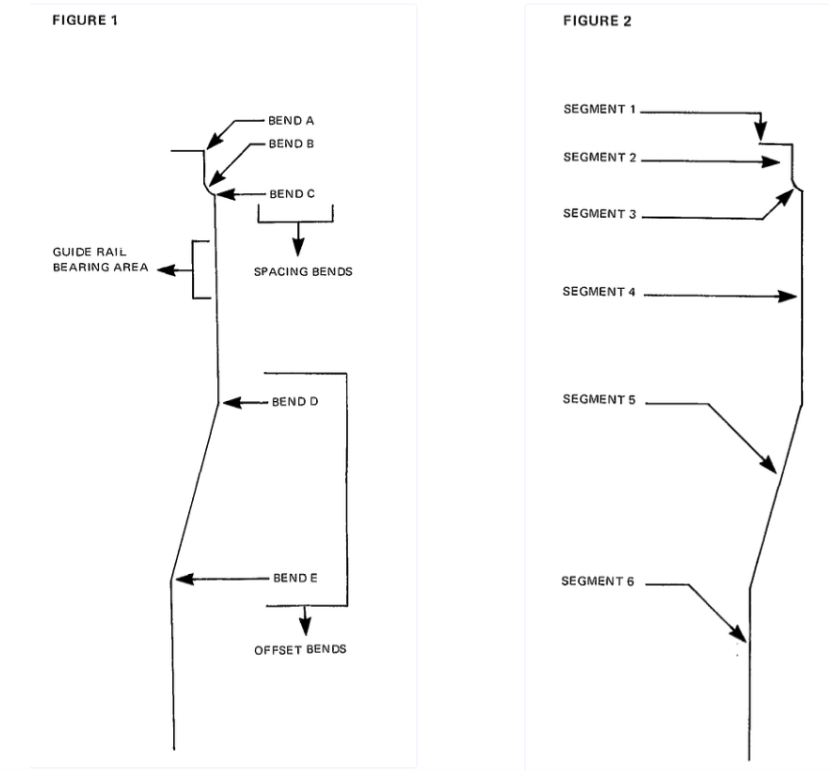
If the key is twisted, do not try to straighten it by steaming the entire length of the key. If you do so, the pressure exerted by the jig will most likely break the key in half at the balance rail hole. Instead, clamp the key firmly near the key button and twist one or both ends (see Figure 2).
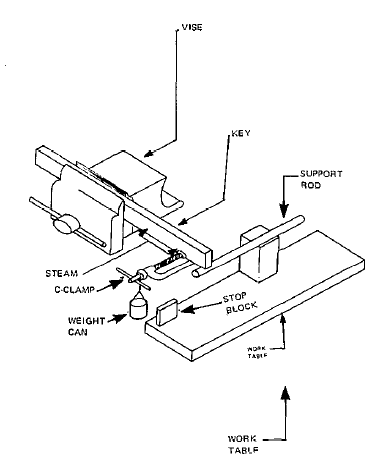
It is essential to use a C-clamp as a twisting lever with added weight to pull the key back into alignment. It is also crucial to use a stop block to prevent over-twisting the key. When using weights to twist the key, the support rod (an old lyre rod or something comparable) is very important. If no support is provided, the steaming and the weights will cause the key not only to untwist but also to warp downwards, creating a new problem while solving the original one.
Before applying steam, check the weight to be used. It should be heavy enough to cause a slight twist in the key without steam, but not so heavy that wood fibers are snapped. A coffee can on a string is effective because weight (old tuning pins or key leads, etc.) can be added or removed easily as necessary. The actual weight required depends on the size of the C-clamp used. The leverage angle increases with the clamp size, and the weight of the clamp itself becomes a factor. A standard reach clamp larger than 6-inch capacity may require no additional weight whatsoever. In general, the shorter the span of key length to be twisted (the distance between vise and clamp), the more weight is needed.
After applying steam continuously for a couple of minutes, the key will visibly begin twisting. Avoid letting it go too fast and remove some weight if necessary. Keep the steam hose moving around to all surfaces of the key. Once the key has twisted slightly beyond the desired point, the clamp should touch the stop block. Remove the steam and let the key sit in that position for a while before removing the clamp. If the key is not perfectly straight when the clamp is removed, adjust the stop block height accordingly and repeat the steaming process.
The steam may have loosened the keytop, and almost certainly will have loosened the bushings. Re-bush when dry and check the keytop.
What's Your Reaction?