


Four fundamental characteristics for a soundboard
The article describes the four basic requirements for a soundboard to function properly and methods for repairing the most common defects, such as cracks, loose ribs and a lean bridge. It explains how the resizing of the soundboard must be done with care, since a too flexible soundboard could give way under the pressure of the strings, while a too stiff one would not respond to stresses. It describes how the soundboard is thinned out safely and how cracks can be repaired by drying the board, using temporary wooden wedges, and applying glue. It also explains how to repair loose ribs and canted bridge using different methods, with an evaluation of the various methods.
For a soundboard to function correctly, it must meet four fundamental requirements:
(1) It must have excellent tonal properties to disperse and amplify sound correctly.
(2) It must have enough flexibility for free movement.
(3) It must have adequate stiffness to withstand the pressure caused by downbearing.
(4) It must have structural stability, which means that the glue joints between the planks must be secure, as well as those between the board and its accompanying parts, such as ribs, bridges, belly rail, and rim.
To satisfy the first requirement, the manufacturer of high-quality pianos pays significant attention to scaling the board before installation in the case. Scaling is often considered to involve only wire diameters and speaking lengths, but there is more to it than that. A crucial aspect of scaling involves the placement and shaping of the ribs, including the thinning of the rib ends. Equally important is the way in which the soundboard is thinned. The designer knows that thinning will provide greater flexibility but only at the expense of strength.
If the board is thinned for maximum flexibility, it will buckle under the downpressure of the strings, which amounts to hundreds of pounds. If the board is made thick enough to ensure crown maintenance under any conditions for the instrument's lifetime, it may be too rigid to respond. As in string scaling, a compromise must be reached. The areas that can be safely thinned are carefully marked on a pattern, and the "island" thus created is drawn on the soundboard. The bellyman then thins the board outward from the island, checking his work with an outside caliper at various checkpoints.
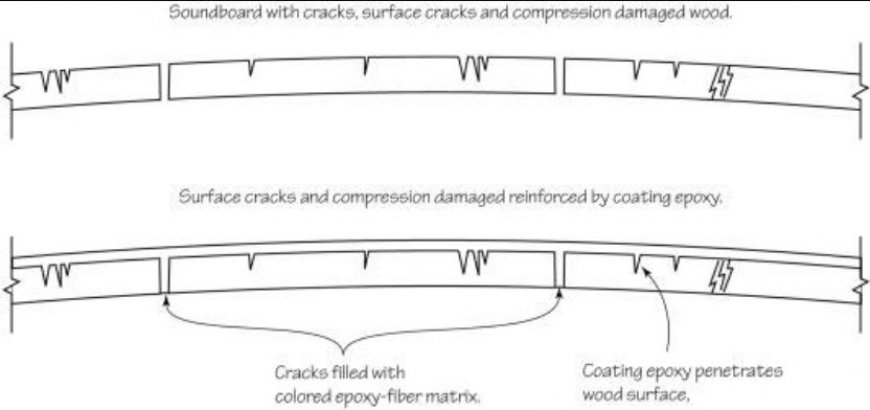
When we undertake a rebuilding job, unless we install a new board, we are primarily concerned with the fourth requirement, structural integrity. We can't do much about the original scaling, but we can ensure that everything is tightly secured. Soundboard cracks are the most visible repair candidates, but they rank a distant fifth in importance, well behind loose ribs, bridges, edges, and compression ridges.
Before any repair work is undertaken, the board must be completely dried so that it shrinks to its practical minimum dimension across the grain. This can be accomplished by using a small electric heater placed beneath the piano. Heavy moving blankets draped over the rim will concentrate the heat in the soundboard area while allowing the moisture to escape through the cloth. Plastic drop cloths are unsuitable because they keep the moisture contained inside. The time required to bake the board depends on its current level of dryness (time of year) and the size and temperature setting of the heater. As a rule of thumb, bake until the cracks approximately double in width, or until a popping sound (a rib letting go) is heard, whichever comes first. Keep the heat on during the repair procedures.
If the crown is subpar, temporary wooden wedges can be tapped between beams and ribs toward the center of the board, pushing it upward. The heat will tend to warp the ribs upward a bit, and any cracks will be widened somewhat. When the shimming is completed, the crown will be enhanced somewhat because of the wedges. Care should be taken, though, not to be overly enthusiastic when hammering wedges in because cracking a rib would worsen the situation. A judicious tap or two is sufficient, not a home run blow. As the board shrinks with the heat, the wedges will become even tighter, but leave them be. After all repairs and shimming are completed, and the heat is turned off, the board will belly up, and the wedges will practically fall out. This will indicate an increase in crown, in case reassurance is needed after all that work.
Check the edges of the board all around to ensure it is glued solidly to the rim and belly rail. If it isn't, re-glue it. To clamp the joint, choose from three options: clamping, fastening with screws, or weighting. Clamping along the belly rail is simple because the ceiling of the damper action cavity provides excellent purchase for an ordinary C-clamp. If it is not available, the guide rail itself can be used as a clamp, with shims if necessary to compensate for areas on the bottom of the rail that do not touch the board.
Panhead sheet metal screws are ideal for clamping purposes around the rim. The flat underside of the head will pull the board down without splitting it, as a flathead screw might. This is a more positive clamping action than weights and is an alternative to investing in special rim clamps or a go-bar deck. As long as the screws are not visually unattractive or interfering with the positioning of the plate, they may be left permanently in place.
Next, inspect the ribs for any possible separation from the board. If there is separation, it will typically occur near a crack in the board. One way to detect separation without climbing under the piano is to run a finger back and forth across the crack. The slightest difference in the level of the board from one side of the crack to the other is a sure indication of separation.
Any separation should lead to a thorough inspection of all glue joints, as whatever caused one joint to fail has likely affected other joints as well. If a rib has separated near a crack in the board, the other ribs that intersect that crack are usually loose as well.
One way to re-fasten loose ribs is to use rib jigs like the one illustrated in the January issue on page 21. Drill a small hole (1/16 inch or smaller) through the center of the crack, all the way through the rib. Run the wire through from the bottom and position the jig over the crack. Put the wire in the becket hole and turn the pin enough to take up some slack, but don't tighten it yet. Repeat this process for each rib along that particular crack. Glue and clamp all of them simultaneously because if one rib is tightened before glue is applied to neighboring ribs, there will not be enough clearance to get the glue between the rib and board.
Apply the glue with a thin piece of metal, such as a flattened piece of piano wire, then tighten the clamps. It is essential to keep the heat under the board throughout the entire process because the moisture in the glue will have a swelling effect on the wood anyway, and it's necessary to minimize this.
There are alternative methods to secure loose ribs apart from the one mentioned earlier. One of the best ways is by using a go-bar deck, as it doesn't require any holes to be drilled in the ribs. However, this method can be expensive. Other methods involve using screws, bolts, or dowels, which may require a relatively large hole in the rib. The more wood removed from the rib, the weaker it becomes, even if the holes are filled with wooden dowels or plugs. These methods also have the disadvantage of creating visible repairs. On the other hand, the wire-and-jig method involves a tiny hole that is hidden by the shim from above, and its impact on the rib's strength is minimal.
In my view, soundboard toggles should never be used as they can cause permanent damage by creating a 1/4-inch hole through the rib. While they may be convenient for on-the-spot repair work, the cost outweighs the benefits. Here is how I would rank the various methods for refastening ribs:
- Excellent: Go-bars on soundboard with ribs supported
- Very Good: Rib jigs with wires passing through tiny holes in ribs
- Fair to Good: Wood screws (the smaller, the better) through board into rib
- Fair to Poor: Bolts used to pull the board, bolt holes then doweled
- Very Poor: Soundboard toggles
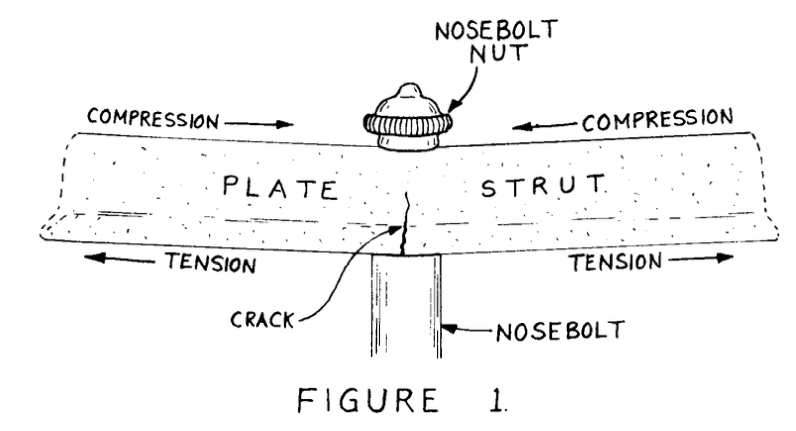
Refastening a bridge is a different matter entirely. For one thing, we are dealing with hardwood, and for another, the board doesn't vibrate under the bridge like it does elsewhere. Thus, adding screws and dowels here won't cause any harm. When dealing with a canted bridge, refer to the January "Forum," pages 20 and 21. For a simple refastening, drill for screws and refasten with glue if possible. In some cases, there may not be enough clearance between the bridge and the board to get glue into the joint without damaging either one. In such cases, use screws with buttons from underneath. Be sure to avoid the bridge pins. If the bridge is 1-1/4 inches high and the thickness of the soundboard and button is 9/16 inch, then a 1-1/8-inch FH No. 8 wood screw would be appropriate. If the screw is too long, it could interfere with the bridge pins, and if it's too short, it won't get a good grip on the body of the bridge.
Shimming is often considered an art, perhaps rightfully so, mostly by those who lack the knowledge of how to do it. It's a highly skilled operation, but definitely achievable by an experienced technician with a low klutz factor and a good understanding of their tools and materials. The first thing we need to understand is why we shim a crack at all.
We shim to restore the soundboard's structural integrity. We fill the gap between two pieces of wood with another piece of the same type of wood, glued tightly in place. If the shim extends through the board and the glue joint is secure, it becomes a part of the board rather than just a cosmetic addition to the top. Although admittedly narrow, it becomes another flitch, and there is no good reason to consider a properly shimmed board any weaker than a new one.
By adding wood where there was none, we have also minutely increased the effective vibrating area. If we do the job neatly, we have also enhanced the soundboard's appearance, which is a reasonable secondary goal.
Starting from the top and going clockwise: a triangular shavehook, especially useful for scraping bridges; soundboard scrapers made from plane irons; narrow and wide-angle shimming knives; a regular knife; a triangular burnisher for rolling wire edges on a scraper blade; a small razor knife, and a chisel.
Before shimming, it is crucial that the soundboard and the shims have the same moisture content. If the shims are drier than the board, they will protrude above the board's surface several days after finishing the board. Conversely, if they are wetter, they will recede. The easiest way to equalize the moisture content is to lay the shims on the board and leave them there during the entire baking process.
Prior to commencing the task, make sure that all tools are sharp. Spruce is not as lenient as maple and will respond negatively if encountered with a dull edge. While maple can be pushed and shoved around a fair bit, spruce must be cut cleanly.
Inspect the board's cracks. A crack that initiates at the rim and ends at the bridge or another section of the rim will necessitate a double-ended shim, which is the most challenging type to adjust. A crack that starts at the rim and runs to the belly rail requires only one fitted end, as the other end will protrude from the front edge of the board to be trimmed later, which is a lot simpler to adjust. The simplest of all is a crack that starts at the belly rail and ends at a nosebolt hole, as neither end requires adjustment. If a crack begins at the rim in the area of the rear lid hinge and runs toward the belly rail but stops somewhere in the middle, it should be sliced all the way to the belly rail. If it isn't, the crack will almost certainly widen beyond the shim's end at some point in the future. The unevenness of expansion/contraction between the shimmed and unshimmed lengths of the annular ring line is compounded by the additional moisture of the glue in the shimmed section, which generally causes the previously uncracked portion to widen within hours or days. This is a typical error.
There are numerous ways to adjust the end of a shim, and I won't presume that my way is the only good one; but it works for me, so I employ it. I shape the end like the bow of a boat. Carve a radius on the bottom of the shim's end using a hobby knife or another extremely sharp blade. Then, by maintaining the angle of the shim's sides. Using a piece of sandpaper placed face up on the board or another flat surface, fair the end (make a smooth, even curve), both upward and inward, on both sides if this is a single-ended shim. The preliminary preparation is now complete.
Using a shimming tool, cut the crack into a V-shape that matches the shim's angle. Ensure that the tool is sharp, or it may simply spread the crack without cutting. Spreading only crushes wood fibers, creating dead pulpy wood on either side of the shim. This dead wood will crack during the next dry season, so if you spread the crack, you have created two more potential cracks while repairing only one. Such techniques are more reminiscent of federal bureaucracy than of good workmanship.
Make sure the shim goes all the way through the soundboard. Fit it without glue, notching it wherever it touches a rib. If the board's grain is wavy, tight spots will need to be carefully relieved with a knife. If there is a crossing grain pattern on the board's surface, some annular rings will have to be severed individually. This is the tricky part, and the technician may be tempted to use some kind of resin filler at this point. Non-woodworkers have even tried to justify their use of fiberglass or other resins for shimming, claiming that the fiberglass has equal or even superior sound transmission properties to spruce. If that were true, one wonders why entire soundboards are not molded from such materials. Resist the temptation to use synthetics, and I believe you will have a better job.
When the shim fits tightly, with no gaps anywhere, it may be glued into position. The glue joint should be clamped with go-bars or weights. Large tin cans filled with old tuning pins work well for this purpose if go-bars are not available.
Techniques vary, but I prefer to do all shimming before scraping the board. The reason for this is that the glue squeezes out on either side of the shim, and on bare wood, it has a tendency to lift the grain. By leaving the old varnish on while shimming, this problem is avoided because the glue won't stick to the old varnish. Before applying glue, make a pencil mark on the board at right angles to the shim and a corresponding mark on the shim. This allows for perfect alignment of the shim, even though the glue hides the ends of the V-cut in the board. Another useful tip is to mark the shim according to the grain direction before cutting it to fit, especially if one end will be butting against the rim. Install it so that the rising grain is toward the rim, thus providing ample clearance for the chisel when trimming the top of the shim after installation.
Trimming is easy, provided you go in the right direction. If you're unsure, test the shim by making a tentative cut in the top of the shim. If the blade wants to go deeper into the shim, you're going in the wrong direction. Sometimes the grain will wave up and down. If this happens, trim it with a very sharp chisel at a 45-degree angle instead of parallel with its length. Don't try to remove too much material in one pass; let the feel of the blade in the wood warn you of any changes in the grain. You may have to change directions two or three times on a single shim. When the shimming is complete, turn off the heater and remove any wedges under the ribs.
Obviously, we cannot use standard supply-house shims here because we would end up with shims on top of shims, and the underside would be kindling. This is dead pulpy wood. It must be removed and replaced with new wood. What is needed here is either a giant shim about an inch wide or a new section of soundboard material. We will make our shim from select, seasoned, quartersawn spruce that has approximately the same annular ring count as the wood around it. Our new shim will be far too stiff to bend, and since we are cutting such a wide area out, we cannot follow the grain line. Therefore, we cannot use a regular shimming tool. With a straightedge, mark the area to be cut out and cut it very carefully at an angle (like a shim) with a very sharp blade. Carefully pull it loose from the ribs and use it as a rough pattern to make the new shim. Cut the shim oversize and gradually file or sand it to fit. Clean the old glue from the tops of the ribs, and ensure the bottom of the new piece will seat firmly on both edges as well as on the ribs. Glue it in place with weights, jigs, or go-bars. When dry, trim and sand it flush with the board. Admire the results with pride because you have just accomplished the most difficult of all soundboard repairs.
What's Your Reaction?